

From Scratch to Spectacular: Designing Gingerbread Houses & Villages
There's a special kind of magic that fills the air during the holidays, and few traditions capture it quite like designing and building gingerbread houses and villages. More than just a festive treat, a gingerbread creation is a miniature work of art – a delicious blend of architectural ingenuity and sugary artistry. Whether you dream of a single, show-stopping gingerbread home or an entire bustling village, this guide will walk you through the journey from humble ingredients to a spectacular display. We'll cover everything from sturdy construction techniques to intricate decorating tips, ensuring your masterpiece is both beautiful and built to last (whether it's edible or a cherished reusable decoration).
The Foundation: Gingerbread House Basics
The secret to a successful gingerbread house lies in its foundation: the gingerbread itself. Not all gingerbread recipes are created equal; for structural integrity, you'll need a dough that bakes up firm and holds its shape, rather than a soft, chewy cookie. Look for recipes specifically labeled 'structural gingerbread' or 'gingerbread house dough' that minimize leavening agents.
Equally important is royal icing, the 'mortar' that binds your architectural marvel together. A properly made royal icing (made with meringue powder or egg whites, powdered sugar, and a touch of liquid) will dry rock-hard, providing the necessary strength. For decorating, you'll want different consistencies – thicker for piping details and thinner for flooding surfaces.
Essential Tools and Materials
Gathering your tools before you begin will streamline the process. You'll need sturdy rolling pins, sharp knives or gingerbread house cutters, baking sheets lined with parchment paper, and a ruler for precise measurements. For the icing, invest in good quality piping bags and various tips (small round for outlines, star tips for decorative borders, and a larger round tip for assembly).
And, of course, the fun part: decorations! Think beyond simple candies. Consider pretzels for fences, shredded coconut for snow, cereal for roof shingles, wafer cookies for doors, and an array of colorful candies, sprinkles, and edible glitter to bring your vision to life.
Construction 101: Building Your Gingerbread Dream
Start with a solid template. You can find many free templates online, or design your own! Once your gingerbread pieces are baked and completely cooled (this is crucial to prevent warping), it's time for assembly. Use a thick consistency of royal icing to 'glue' your walls together, holding them in place until the icing sets. A few cans or blocks can act as temporary supports.
Patience is your best friend here. Allow each section to dry thoroughly before adding the roof or moving to the next wall. This staggered approach ensures a strong, stable structure. Don't worry about messy seams at this stage; they'll be covered by decorative icing later.
Before you commit to your final candy layout, wouldn't it be great to see different designs come to life? cta_id. Upload a photo of your gingerbread pieces and envision various frosting patterns or candy placements without making a single sticky mistake!
Decorating Delights: Bringing Your Vision to Life
This is where your creativity truly shines! First, decide on a theme. Will it be a rustic cabin, a whimsical fairytale cottage, a modern minimalist dwelling, or a traditional winter wonderland? Your theme will guide your choice of colors and candies.
Start with the 'base' decorating: pipe snow onto the roof, outline windows and doors, and add structural details like siding or bricks with different icing techniques. Then, move on to the candies. Think about scale and texture. Use larger candies for focal points and smaller sprinkles for intricate details. Create paths, hedges, or even tiny lampposts.
Advanced Techniques for a "Spectacular" Finish
For truly show-stopping gingerbread houses, consider these advanced touches: Create 'stained glass' windows by melting crushed hard candies in the window openings of your gingerbread pieces while they're still hot from the oven, or use gelatin sheets cut to size. Battery-operated LED tea lights can add a warm, inviting glow from within. For an edible landscape, use colored shredded coconut for grass, pretzel sticks for fences, and inverted ice cream cones decorated with green icing for evergreen trees.
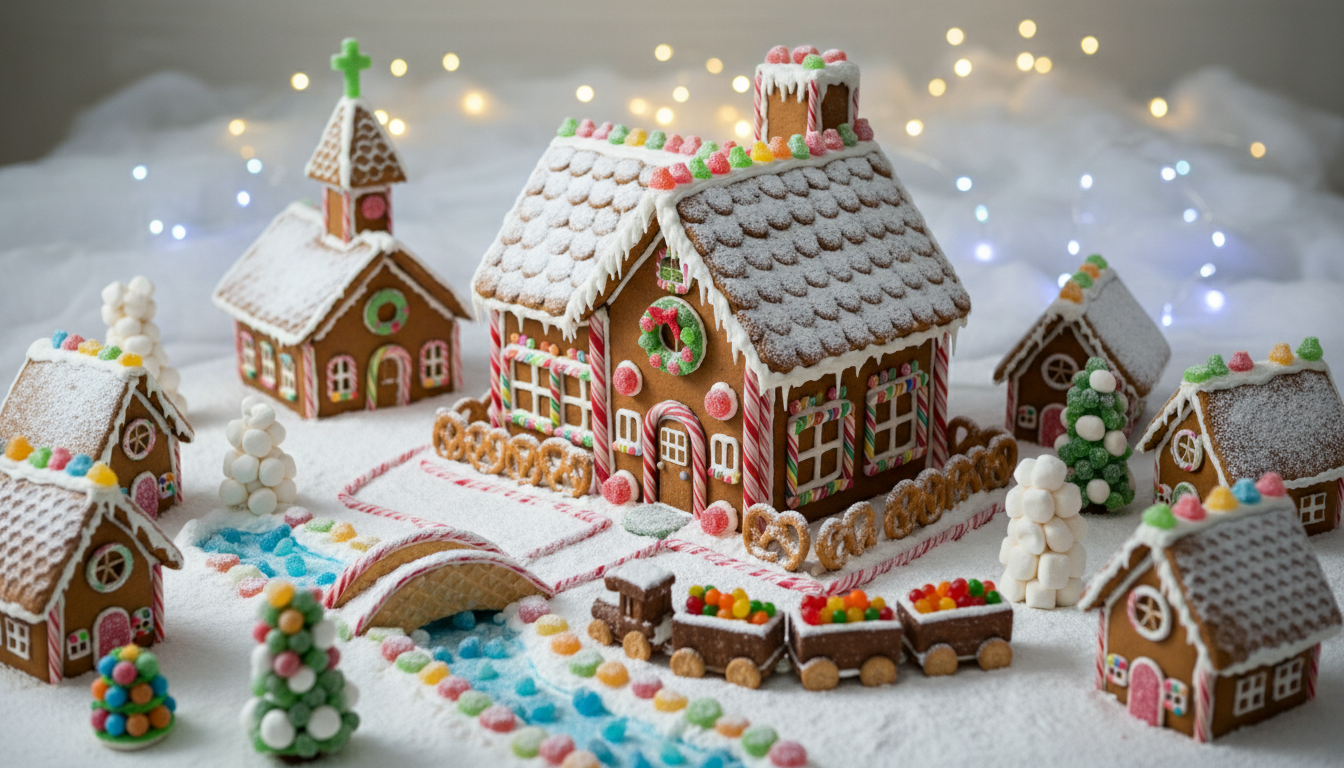
Expanding Your World: Designing a Gingerbread Village
Why stop at one house when you can create an entire village? Designing a gingerbread village involves thinking about the overall layout and flow. Plan pathways connecting structures, create focal points like a town square or a church, and vary the heights and styles of your buildings for visual interest. Consider adding complementary structures like a bakery, a cozy stable, or Santa's workshop.
Integrating your gingerbread village with your existing holiday decor can elevate its impact. Think about where it will sit in your home – on a mantel, a side table, or as a centerpiece. Looking for inspiration on how to beautifully integrate your gingerbread village into your broader holiday theme? cta_id and visualize how different seasonal styles can enhance your display.
Beyond Edible: Creating Reusable Gingerbread Displays
If you want a gingerbread display that lasts year after year, consider using non-edible materials for the core structure. Craft foam, cardboard, or even lightweight wood can provide a sturdy base. You can then decorate these with actual gingerbread pieces, non-toxic icing substitutes, and durable craft embellishments like glitter, miniature figurines, or artificial snow. This allows for more intricate designs and worry-free storage.
For reusable displays, store them carefully in airtight containers, ideally with silica gel packets to absorb moisture, in a cool, dry place. This protects them from humidity and dust, ensuring they look spectacular for many seasons to come.
Capturing the Magic: Photographing Your Masterpiece
After all your hard work, you'll want to capture your gingerbread creation in its best light. Use natural, soft lighting if possible, or diffuse artificial light. Experiment with different angles – eye-level shots can make the house feel immersive, while overhead shots can highlight the intricate roof details and village layout. A simple, uncluttered background will help your gingerbread house stand out.
Ready to share your creation with the world and make it truly pop? cta_id. Brighten, sharpen, and perfect your images with AI, ensuring every detail of your spectacular gingerbread design is highlighted.
Your Gingerbread Journey Awaits!
Designing and building a gingerbread house or village is a rewarding holiday tradition that combines creativity, precision, and a whole lot of festive cheer. Whether you're a beginner or a seasoned builder, the joy lies in the process and the spectacular edible (or reusable) art you create. With the right techniques and a dash of imagination, your gingerbread masterpiece is sure to be a cherished centerpiece of your holiday decor. And remember, Ideal House tools are here to help you visualize, integrate, and present your stunning creations!